8. Installation of K8s on virtual machines
8.1. Quick Start
Only 1 command to try virtual deployment, if you have Internet access. Just Paste it and Run.
curl https://raw.githubusercontent.com/opnfv/compass4nfv/master/quickstart_k8s.sh | bash
If you want to deploy noha with1 controller and 1 compute, run the following command
export SCENARIO=k8-nosdn-nofeature-noha.yml
export VIRT_NUMBER=2
curl https://raw.githubusercontent.com/opnfv/compass4nfv/stable/gambia/quickstart_k8s.sh | bash
9. Installation of K8s on Bare Metal
9.1. Nodes Configuration (Bare Metal Deployment)
The below file is the inventory template of deployment nodes:
“compass4nfv/deploy/conf/hardware_environment/huawei-pod1/k8-nosdn-nofeature-ha.yml”
You can write your own IPMI IP/User/Password/Mac address/roles reference to it.
- name – Host name for deployment node after installation.
- ipmiVer – IPMI interface version for deployment node support. IPMI 1.0 or IPMI 2.0 is available.
- ipmiIP – IPMI IP address for deployment node. Make sure it can access from Jumphost.
- ipmiUser – IPMI Username for deployment node.
- ipmiPass – IPMI Password for deployment node.
- mac – MAC Address of deployment node PXE NIC.
- interfaces – Host NIC renamed according to NIC MAC addresses when OS provisioning.
- roles – Components deployed.
Set TYPE/FLAVOR and POWER TOOL
E.g. .. code-block:: yaml
TYPE: baremetal FLAVOR: cluster POWER_TOOL: ipmitool
Set ipmiUser/ipmiPass and ipmiVer
E.g.
ipmiUser: USER
ipmiPass: PASSWORD
ipmiVer: '2.0'
Assignment of different roles to servers
E.g. K8s only deployment roles setting
hosts:
  - name: host1
    mac: 'F8:4A:BF:55:A2:8D'
    interfaces:
       - eth1: 'F8:4A:BF:55:A2:8E'
    ipmiIp: 172.16.130.26
    roles:
      - kube_master
      - etcd

  - name: host2
    mac: 'D8:49:0B:DA:5A:B7'
    interfaces:
      - eth1: 'D8:49:0B:DA:5A:B8'
    ipmiIp: 172.16.130.27
    roles:
      - kube_node
9.2. Network Configuration (Bare Metal Deployment)
Before deployment, there are some network configuration to be checked based on your network topology.Compass4nfv network default configuration file is “compass4nfv/deploy/conf/hardware_environment/huawei-pod1/network.yml”. This file is an example, you can customize by yourself according to specific network environment.
In this network.yml, there are several config sections listed following(corresponed to the ordre of the config file):
9.2.1. Provider Mapping
- name – provider network name.
- network – default as physnet, do not change it.
- interfaces – the NIC or Bridge attached by the Network.
- type – the type of the NIC or Bridge(vlan for NIC and ovs for Bridge, either).
- roles – all the possible roles of the host machines which connected by this network(mostly put both controller and compute).
9.2.2. System Interface
- name – Network name.
- interfaces – the NIC or Bridge attached by the Network.
- vlan_tag – if type is vlan, add this tag before ‘type’ tag.
- type – the type of the NIC or Bridge(vlan for NIC and ovs for Bridge, either).
- roles – all the possible roles of the host machines which connected by this network(mostly put both controller and compute).
9.2.3. IP Settings
- name – network name corresponding the the network name in System Interface section one by one.
- ip_ranges – ip addresses range provided for this network.
- cidr – the IPv4 address and its associated routing prefix and subnet mask?
- gw – need to add this line only if network is external.
- roles – all the possible roles of the host machines which connected by this network(mostly put both controller and compute).
9.2.4. Internal VIP(virtual or proxy IP)
- ip – virtual or proxy ip address, must be in the same subnet with mgmt network but must not be in the range of mgmt network.
- netmask – the length of netmask
- interface – mostly mgmt.
9.2.5. Public VIP
- ip – virtual or proxy ip address, must be in the same subnet with external network but must not be in the range of external network.
- netmask – the length of netmask
- interface – mostly external.
9.2.6. Public Network
- enable – must be True(if False, you need to set up provider network manually).
- network – leave it ext-net.
- type – the type of the ext-net above, such as flat or vlan.
- segment_id – when the type is vlan, this should be id of vlan.
- subnet – leave it ext-subnet.
- provider_network – leave it physnet.
- router – leave it router-ext.
- enable_dhcp – must be False.
- no_gateway – must be False.
- external_gw – same as gw in ip_settings.
- floating_ip_cidr – cidr for floating ip, see explanation in ip_settings.
- floating_ip_start – define range of floating ip with floating_ip_end(this defined range must not be included in ip range of external configured in ip_settings section).
- floating_ip_end – define range of floating ip with floating_ip_start.
The following figure shows the default network configuration.
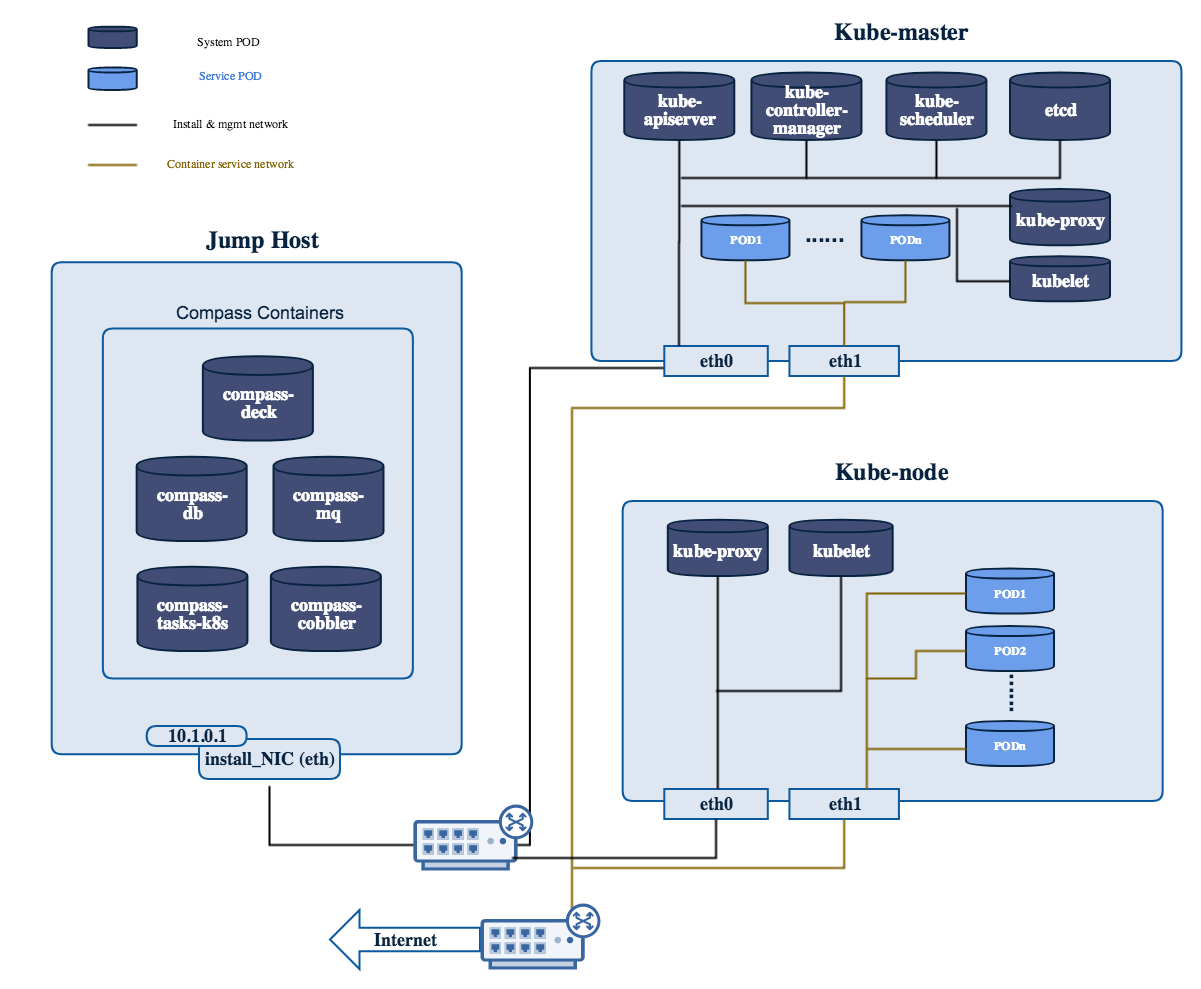
Fig 5. Kubernetes network configuration
9.3. Start Deployment (Bare Metal Deployment)
- Edit deploy.sh
- 1.1. Set OS version for deployment nodes.
- Compass4nfv supports ubuntu and centos based openstack newton.
E.g.
# Set OS version for target hosts
# Only CentOS7 supported now
export OS_VERSION=centos7
1.2. Set tarball corresponding to your code
E.g.
# Set ISO image corresponding to your code
export ISO_URL=file:///home/compass/compass4nfv.tar.gz
- 1.3. Set hardware deploy jumpserver PXE NIC. (set eth1 E.g.)
- You do not need to set it when virtual deploy.
E.g.
# Set hardware deploy jumpserver PXE NIC
# you need to comment out it when virtual deploy
export INSTALL_NIC=eth1
1.4. K8s scenario that you want to deploy
E.g.
nosdn-nofeature scenario deploy sample
# DHA is your dha.yml's path
export DHA=./deploy/conf/hardware_environment/huawei-pod1/k8-nosdn-nofeature-ha.yml

# NETWORK is your network.yml's path
export NETWORK=./deploy/conf/hardware_environment/huawei-pod1/network.yml
- Run
deploy.sh
./deploy.sh